
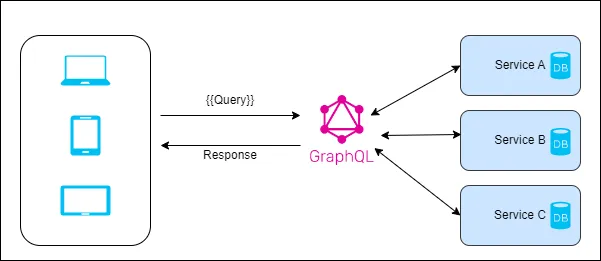
GraphQL queries have revolutionized the way developers interact with APIs, offering a more flexible and efficient approach to data fetching. As you delve into the world of GraphQL in .NET, you’ll discover how this powerful query language can streamline your application’s data management. With its ability to request precisely the data you need and nothing more, GraphQL has a significant impact on performance and developer productivity.
In this comprehensive tutorial, you’ll learn to set up a GraphQL environment in .NET and create basic queries. You’ll also explore advanced techniques to enhance your query execution skills. By the end, you’ll have a solid grasp of GraphQL query execution in .NET, enabling you to build more efficient and scalable applications. Whether you’re new to GraphQL or looking to deepen your knowledge, this guide will equip you with the tools to leverage GraphQL queries effectively in your .NET projects.
Setting Up the GraphQL Environment in .NET
To get started with GraphQL in your .NET project, you’ll need to set up the necessary environment. This involves installing the required packages, configuring the GraphQL client, and downloading the GraphQL schema. Let’s walk through these steps to ensure you have a solid foundation for working with GraphQL queries in .NET.
Installing Required Packages
To begin, you’ll need to add the essential packages to your .NET project. GraphQL.NET provides several packages to support different functionalities. Here’s how to install the core packages:
- Install the main GraphQL.NET engine:
>dotnet add package GraphQL - Add a serializer package. You have two optio
ns:
>dotnet add package GraphQL.SystemTextJson
or
>dotnet add package GraphQL.NewtonsoftJson - For document caching, install:
>dotnet add package GraphQL.MemoryCache - If you need DataLoader functionality:
>dotnet add package GraphQL.DataLoader - For advanced dependency injection:
>dotnet add package GraphQL.MicrosoftDI
Configuring the GraphQL Client
After installing the packages, you’ll need to configure the GraphQL client in your .NET application. This step involves setting up the necessary services and middleware.
- Add the required services to your dependency injection container. This typically involves registering the GraphQL types and schemas you’ll be using.
- Configure the GraphQL middleware to expose your GraphQL server at an endpoint. This allows you to access the GraphQL playground and execute queries.
- If you’re using subscriptions, ensure that your DocumentExecuter is properly configured to handle them alongside queries and mutations.
Downloading the GraphQL Schema
To work effectively with a GraphQL API, you’ll need to download its schema. This schema defines the types and operations available in the API. Here’s how to do it:
- Use the Strawberry Shake CLI tool to download the schema. First, install the tool:
dotnet new tool-manifest
dotnet tool install StrawberryShake.Tools –local - Run the following command to initialize your project with a GraphQL schema:
dotnet graphql init <ServerUrl> -n <ClientName>
Replace <ServerUrl> with your GraphQL server’s URL and <ClientName> with your desired client name . - This command will generate the schema files in your project, including schema.graphql and schema.extensions.graphql.
- To keep your schema up-to-date, you can use the update command from here.
By following these steps, you’ll have set up a robust GraphQL environment in your .NET project, ready for executing queries and building powerful GraphQL-enabled applications.
Creating and Executing Basic GraphQL Queries
Now that you’ve set up your GraphQL environment in .NET, it’s time to dive into creating and executing your first queries. GraphQL offers a more flexible and efficient approach to data fetching, allowing you to request exactly what you need and nothing more.
Writing Your First Query
To get started with GraphQL queries, you’ll need to understand the syntax and structure. Here’s how to write your first query:
- Open your GraphQL IDE or playground. If you’ve set everything up correctly, you should be able to access it at http://localhost:5000/graphql (your port might differ) .
- Click on “Create document” in the IDE. You’ll see a settings dialog for the new tab. Make sure the “Schema Endpoint” input field has the correct URL for your GraphQL endpoint .
- In the top left pane of the editor, paste the following query:
{
book {
title
author {
name
}
}
}
This query requests the title of a book and the name of its author . - To execute the query, simply press the “Run” button. The result will be displayed as JSON in the top right pane .
Parsing and Handling Query Results
Once you’ve executed your query, you’ll need to parse and handle the results in your .NET application. Here’s how to do it:
- Create a GraphQLQuery class to handle the query and variables:
public class GraphQLQuery
 {
       public string Query { get; set; }
       public Dictionary<string, string> Variables { get; set; }
} - Deserialize the JSON request into the GraphQLQuery object:
var request = "{\"query\":\"query RouteQuery { viewer { routes{ createdOn, machine } } }\",\"variables\":{\"one\":\"two\"}}";
var query = JsonConvert.DeserializeObject<GraphQLQuery>(request); - Use the ToInputs() method to convert the variables to an Inputs object:
var inputs = query.Variables.ToInputs(); - Execute the query using the DocumentExecuter:
var result = await _executer.ExecuteAsync(_schema, null, query.Query, query.OperationName, inputs); - Handle the result in your application logic, extracting the data you need from the ExecutionResult object .
By following these steps, you’ll be able to create and execute basic GraphQL queries in your .NET application, taking advantage of GraphQL’s flexibility and efficiency in data fetching.
Advanced Query Techniques
Using Variables in Queries
To enhance your GraphQL queries, you can leverage variables to make them more dynamic and reusable. Variables allow you to pass values from your application or users to your queries and mutations. This approach is particularly useful when you need to build queries that accept input from search boxes or column filters .
To use variables, you define them in your query and then provide their values separately. Here’s an example of a query with a variable:
query DroidQuery($droidId: String!) {
 droid(id: $droidId) {
   id
   name
 }
}
The corresponding JSON request would look like this:
{
 "query": "query DroidQuery($droidId: String!) { droid(id: $droidId) { id name } }",
 "variables": {
   "droidId": "1"
 }
}
To parse this JSON request in your .NET application, you can use the GraphQLSerializer:
var request = new GraphQLSerializer().Deserialize<GraphQLRequest>(requestJson);
var result = await schema.ExecuteAsync(options => {
   options.Query = request.Query;
   options.Variables = request.Variables;
});
Implementing Pagination
Pagination is crucial for managing large datasets efficiently. With Hot Chocolate, implementing pagination in your GraphQL queries is straightforward. You can use the UsePaging attribute to set up cursor-based pagination .
Here’s how to implement pagination:
- Add the UsePaging attribute to your query:
public IQueryable<CourseType> GetPaginatedCourses([Service] SchoolDbContext dbContext)
{
   return dbContext.Courses.Select(c => new CourseType { /* ... */ });
}
- In your query, you can now use pagination arguments:
query {
 paginatedCourses(first: 3) {
   edges {
     node {
       id
       name
     }
     cursor
   }
   pageInfo {
     hasNextPage
     endCursor
   }
   totalCount
 }
}
This approach allows you to apply pagination directly to your database query, improving performance by only retrieving the necessary data .
Handling Errors
Proper error handling is essential for creating robust GraphQL applications. Apollo Client categorizes errors into two main types: GraphQL errors and network errors .
GraphQL errors are related to server-side execution and include syntax errors, validation errors, and resolver errors. These errors are included in the errors array of the server’s response .
To handle errors effectively, you can define an error policy for your operations. Apollo Client supports three error policies:
- none: The default policy, which sets data to undefined if there are GraphQL errors.
- ignore: Ignores GraphQL errors and caches any returned data.
- all: Populates both data and error.graphQLErrors, allowing you to render partial results and error information .
To specify an error policy, use the options object in your operation hook:
const { loading, error, data } = useQuery(MY_QUERY, { errorPolicy: "all" });
By implementing these advanced query techniques, you’ll be able to create more flexible, efficient, and robust GraphQL applications in .NET.
Conclusion
GraphQL query execution in .NET has a significant impact on how developers interact with APIs, offering a more flexible and efficient approach to data management. This tutorial has walked you through the process of setting up a GraphQL environment, creating basic queries, and exploring advanced techniques to enhance your query execution skills. By leveraging variables, implementing pagination, and handling errors effectively, you can build more robust and scalable applications that make the most of GraphQL’s capabilities.
As you continue to work with GraphQL in your .NET projects, keep in mind the importance of writing clean, efficient queries and handling results properly. The techniques covered in this guide provide a solid foundation to build upon, enabling you to create powerful GraphQL-enabled applications. Remember, practice and experimentation are key to mastering these concepts and unlocking the full potential of GraphQL in your development workflow.