Azure Container Storage: Revolutionizing Container Native Storage Solutions

No Comments »

Azure Container Storage is causing a revolution in the world of cloud-based storage, offering a game-changing approach to manage and scale your containerized applications. This innovative technology provides a seamless integration between Azure’s robust infrastructure and your container workloads, ensuring optimal performance and reliability for your critical data.

With Azure Container Storage, you’ll discover a whole new level of flexibility and efficiency in your container deployments. You’ll learn how this cutting-edge solution enhances application resilience, making your systems more fault-tolerant and reliable. What’s more, you’ll explore how Azure Container Storage streamlines development and operations, allowing you to focus on creating value rather than managing complex storage setups. Get ready to dive into the architecture, benefits, and real-world applications of this groundbreaking technology that’s reshaping the container storage landscape.

Azure Container Storage Architecture

You’re about to dive into the exciting world of Azure Container Storage, a game-changing cloud-based volume management, deployment, and orchestration service built specifically for containers . This innovative solution integrates seamlessly with Kubernetes, allowing you to dynamically and automatically provision persistent volumes for your stateful applications running on Kubernetes clusters .

Storage Pools and Resource Management

At the heart of Azure Container Storage’s architecture are storage pools, which serve as the foundation for efficient resource management. These pools act as a logical construct, simplifying volume creation and management for you as an application developer . Here’s what makes them special:

  1. Homogeneous capacity: The storage capacity within a pool is considered uniform, making it easier to manage resources .
  2. Multiple pools per cluster: Your AKS cluster can have several storage pools, offering flexibility in resource allocation .
  3. Authentication and provisioning boundary: Storage pools provide a secure and organized way to manage your storage infrastructure .

What’s more, volumes are thinly provisioned within these pools, sharing performance characteristics like IOPS, bandwidth, and capacity . This approach ensures optimal resource utilization and cost-effectiveness for your container workloads.

Integration with Kubernetes APIs

One of the most exciting aspects of Azure Container Storage is its tight integration with Kubernetes. This integration brings you several benefits:

  1. Simplified volume orchestration: You can easily deploy and manage volumes within Kubernetes without switching between different control planes .
  2. Native Kubernetes experience: The service leverages familiar Kubernetes APIs, making it intuitive for developers already working with Kubernetes .
  3. Dynamic provisioning: You can automatically provision persistent volumes for your stateful applications, streamlining your development process .

Supported Storage Options and Protocols

Azure Container Storage offers you a range of storage options to suit your specific needs:

  1. Azure Disks: Ideal for databases like MySQL, MongoDB, and PostgreSQL .
  2. Ephemeral Disks: Perfect for extremely latency-sensitive applications with no data durability requirements or built-in data replication support, like Cassandra .
  3. Azure Elastic SAN (Preview): Great for general-purpose databases, streaming and messaging services, and CI/CD environments .

These options provide persistent volume support with ReadWriteOnce access mode to Linux-based Azure Kubernetes Service (AKS) clusters . By offering this spectrum of Azure block storage options, previously available only for VMs, Azure Container Storage empowers you to choose the most suitable and cost-efficient resource for your specific workload performance requirements .

Enhancing Application Resilience

Azure Container Storage offers you a range of features to boost your application’s resilience, ensuring your containerized workloads remain robust and reliable. Let’s dive into some exciting capabilities that’ll revolutionize your container storage solutions!

Multi-zone storage pools

You’ll love the flexibility Azure Container Storage provides with multi-zone storage pools. This feature allows you to distribute your storage capacity across multiple zones, enhancing your application’s fault tolerance. Here’s how it works:

  1. Specify the zones in your storage pool definition.
  2. The total capacity is evenly distributed across the chosen zones.
  3. For example, if you select two zones, each gets half the capacity; three zones, each gets one-third .

This setup is perfect for workloads with application-level replication, like Cassandra. It’s worth noting that persistent volumes can only be created from storage pool capacity in a single zone .

Volume replication for local NVMe

When you need lightning-fast storage performance, Azure Container Storage has got you covered with Ephemeral Disk and local NVMe support. This feature is a game-changer for applications requiring sub-millisecond storage latency .

To ensure data resilience, Azure Container Storage supports volume replication:

  1. Data is copied across volumes on different nodes.
  2. If a replica is lost, the volume is automatically restored .

You can choose between three-replica and five-replica configurations, depending on your needs. Just remember, you’ll need at least three or five nodes in your AKS cluster, respectively .

Snapshot support for backup and recovery

Azure Container Storage takes your data protection to the next level with snapshot support for persistent volumes . This feature enables you to:

  1. Create point-in-time copies of your data.
  2. Quickly restore your volumes in case of data corruption or accidental deletion.

For even more comprehensive protection, Azure offers two backup solutions:

  1. Operational backup: Maintains data in the source storage account for up to 360 days .
  2. Vaulted backup: Transfers data to a backup vault, retaining it for up to 10 years .

These solutions provide you with flexible options to meet your specific backup and recovery needs.

With Azure Container Storage, you’re not just getting storage – you’re getting a resilient, high-performance solution that’ll keep your containerized applications running smoothly, no matter what challenges come your way!

Streamlining Development and Operations

Azure Container Storage is revolutionizing the way you manage and deploy containerized applications. By offering a cloud-based volume management, deployment, and orchestration service built specifically for containers, it’s streamlining your development and operations processes like never before .

Simplified storage management across options

You’ll love how Azure Container Storage consolidates management across familiar block storage offerings, making your life easier . Instead of juggling multiple container orchestration solutions for each storage resource, you can now efficiently coordinate volume provisioning within a unified storage pool for your AKS cluster . This approach allows you to choose the most cost-efficient resource tailored to your specific workload performance requirements .

What’s more, Azure Container Storage surfaces the full spectrum of Azure block storage options that were previously only available for VMs, now making them accessible for containers . This includes:

  1. Ephemeral disk for extremely low latency workloads like Cassandra
  2. Azure Elastic SAN (Preview) for native iSCSI and shared provisioned targets
  3. Azure Disk Storage for traditional persistent storage needs

Automated volume provisioning and scaling

Get ready to supercharge your productivity! Azure Container Storage integrates seamlessly with Kubernetes, allowing you to dynamically and automatically provision persistent volumes for your stateful applications . This Kubernetes-native volume orchestration means you can create storage pools, persistent volumes, capture snapshots, and manage the entire lifecycle of volumes using familiar kubectl commands .

The best part? You won’t have to switch between different toolsets or control planes, making your workflow smoother and more efficient . This streamlined approach helps you:

  1. Accelerate VM-to-container initiatives
  2. Simplify volume management within Kubernetes
  3. Reduce total cost of ownership (TCO) by improving cost efficiency and increasing the scale of persistent volumes supported per pod or node

Integration with third-party solutions

Azure Container Storage takes your cloud journey to the next level by integrating with key third-party solutions. To make your migration to the cloud as painless as possible, Azure has partnered with CloudCasa, a leader in Kubernetes data mobility . With CloudCasa, you can automatically recreate an entire cluster, centralizing the management of cluster recovery and migration .

For robust backup and disaster recovery capabilities, Azure has teamed up with Kasten, the leading service for data protection in Kubernetes . When you deploy your storage pool in Azure Container Storage, you can enable Kasten during snapshot setup . Using dynamic policies, Kasten helps you manage backups at scale in a crash-consistent manner, ensuring your data is always protected .

Conclusion

Azure Container Storage is causing a revolution in the world of cloud-based container solutions, offering a game-changing approach to manage and scale containerized applications. It seamlessly integrates with Kubernetes, allowing for dynamic provisioning of persistent volumes and streamlining development processes. This groundbreaking technology enhances application resilience through features like multi-zone storage pools and volume replication, ensuring fault tolerance and high performance for critical workloads.

To wrap up, Azure Container Storage simplifies storage management across various options, making it easier for developers to focus on creating value rather than managing complex setups. Its integration with third-party solutions like CloudCasa and Kasten further bolsters its capabilities in data protection and disaster recovery. As container technologies continue to evolve, Azure Container Storage stands out as a robust, flexible, and efficient solution, poised to meet the ever-changing needs of modern cloud-native applications.
Azure Integration CoreWCF and WCF Client Queue Storage for .NET

No Comments »

Azure Queue Storage is shaking things up in the world of .NET messaging, offering a game-changing solution for developers. This cloud-based service from Microsoft Azure is transforming how we handle message queues, making your apps more scalable and resilient than ever before.

In this article, we’ll dive into the exciting world of Azure integration with CoreWCF and WCF Client. You’ll discover how to harness the power of Azure Queue Storage to boost your .NET applications. We’ll walk you through the ins and outs of integrating CoreWCF with Azure Queue Storage, and then show you how to do the same with WCF Client. By the end, you’ll have the know-how to take your messaging to the next level with Azure’s cutting-edge technology.

Azure Queue Storage: Revolutionizing .NET Messaging

Overview of Azure Queue Storage

Azure Queue Storage is shaking up the world of .NET messaging with its simple yet powerful approach. It’s a cloud-based service that lets you store and manage a massive number of messages, making it perfect for building flexible and scalable applications . You can access these messages from anywhere in the world using HTTP or HTTPS, giving you incredible flexibility in your app design .

One of the coolest things about Azure Queue Storage is its capacity. A single queue can hold millions of messages, and each message can be up to 64 KB in size . This means you can handle a ton of data without breaking a sweat. Plus, with the total capacity limit of a storage account, you’ve got room to grow .

Comparison with traditional messaging systems

When you stack Azure Queue Storage up against traditional messaging systems, it really shines. Here’s why:

  1. Scalability: Azure Queue Storage is built to handle massive workloads. It can scale to millions of messages per queue, making it perfect for high-volume applications .
  2. Simplicity: Unlike complex messaging systems, Azure Queue Storage offers a straightforward, lightweight service that’s easy to set up and use .
  3. Cost-effectiveness: If you’re looking for a budget-friendly option that doesn’t skimp on performance, Azure Queue Storage is your go-to choice .
  4. Durability: Your messages are in safe hands. Azure Queue Storage offers durable, reliable message storage with guaranteed delivery .

Benefits for .NET developers

As a .NET developer, you’re in for a treat with Azure Queue Storage. Here’s how it can supercharge your applications:

  1. Decoupling components: You can use Azure Queue Storage to separate different parts of your app, allowing them to scale independently. This makes your application more flexible and resilient .
  2. Asynchronous processing: Queue Storage is perfect for handling tasks in the background. You can offload time-consuming jobs from your main application, keeping it snappy and responsive .
  3. Burst handling: When traffic suddenly spikes, Queue Storage acts as a buffer, preventing your servers from getting overwhelmed. You can monitor queue length and add or remove worker nodes based on demand .
  4. Simple workflows: Building basic workflows with decoupled components becomes a breeze with Azure Queue Storage .
  5. Security: Microsoft invests over $1 billion annually in cybersecurity and employs more than 3,500 security experts. With Azure, you get comprehensive security and compliance built right in .

By leveraging Azure Queue Storage, you’re not just adopting a messaging system – you’re revolutionizing how your .NET applications handle communication and scaling. It’s time to take your messaging game to the next level!

CoreWCF and Azure Queue Storage Integration

Get ready to supercharge your .NET services with CoreWCF and Azure Queue Storage! This powerful combination offers a modern replacement for MSMQ, allowing your existing WCF services to communicate seamlessly with clients using Azure’s robust cloud infrastructure .

Setting up the CoreWCF Azure Queue Storage library

To kickstart your integration journey, you’ll need to install the Microsoft.CoreWCF.Azure.StorageQueues library. It’s a breeze with NuGet – just a few clicks, and you’re all set . This library is your gateway to harnessing the full potential of Azure Queue Storage in your CoreWCF services.

Configuring service endpoints

Now, let’s get your CoreWCF service talking to Azure Queue Storage. You’ll need to configure your service with the right endpoint and set up the credentials. But don’t worry, it’s easier than you might think!

Here’s how you can do it in your startup class:

public void ConfigureServices(IServiceCollection services)

public void ConfigureServices(IServiceCollection services)
{
    services.AddServiceModelServices();
    services.AddServiceModelConfigurationManagerFile("appsettings.json");
    services.AddSingleton<IMyService, MyService>();
}
public void Configure(IApplicationBuilder app)
{
    app.UseServiceModel(builder =>
    {
        builder.AddService<MyService>();
        builder.AddServiceEndpoint<MyService, IMyService>(new AzureQueueStorageBinding(), "https://myaccount.queue.core.windows.net/myqueue");
    });
}

This configuration sets up your service to receive requests from Azure Queue Storage .

Implementing message processing logic

With your service configured, it’s time to implement the logic for processing messages. Here’s a simple example of how your service interface and implementation might look:

[ServiceContract]

public interface IMyService
{
    [OperationContract(IsOneWay = true)]
    Task ProcessVideoAsync(long videoId, string videoTitle, string blobStoragePath);
}
public class MyService : IMyService
{
    public async Task ProcessVideoAsync(long videoId, string videoTitle, string blobStoragePath)
    {
        await VideoEngine.ProcessVideoAsync(videoId, videoTitle, blobStoragePath);
    }
}

This example shows a one-way operation for processing videos, demonstrating how you can leverage Azure Queue Storage for asynchronous tasks .

By integrating CoreWCF with Azure Queue Storage, you’re opening up a world of possibilities for your .NET services. You’ll enjoy improved scalability, reliability, and the power of cloud-based messaging. So go ahead, give it a try, and watch your services soar to new heights!

WCF Client and Azure Queue Storage Integration

Ready to supercharge your WCF client with Azure Queue Storage? Let’s dive in and see how you can seamlessly integrate these powerful technologies!

Installing the WCF Azure Queue Storage client library

To get started, you’ll need to add the WCF Azure Queue Storage client library to your project. It’s a breeze with NuGet! Here’s how:

  1. Open your project in Visual Studio.
  2. Head to the Package Manager Console.
  3. Type in this command: Install-Package Microsoft.WCF.Azure.StorageQueues.Client -AllowPrereleaseVersions

And just like that, you’re all set to harness the power of Azure Queue Storage in your WCF client !

Creating and configuring client proxies

Now that you’ve got the library installed, it’s time to set up your client proxies. Here’s a quick rundown: Create a binding instance for Azure Queue Storage:
var aqsBinding = new AzureQueueStorageBinding();

Set up your endpoint address:
string queueEndpointString = "https://MYSTORAGEACCOUNT.queue.core.windows.net/QUEUENAME";

Create a ChannelFactory and open it:
var factory = new ChannelFactory<IService>(aqsBinding, new EndpointAddress(queueEndpointString));

factory.Open();

Create and open a channel:
IService channel = factory.CreateChannel();

channel.Open();

Sending messages to Azure Queue Storage

Now for the fun part – sending messages! Here’s how you can send a message to your Azure Queue Storage:

Use your channel to call your service method:
await channel.ProcessVideoAsync(videoId, videoTitle, blobStoragePath);

Don’t forget to close your channel and dispose of the factory when you’re done:
channel.Close();

await (factory as IAsyncDisposable).DisposeAsync();

And there you have it! You’ve successfully integrated WCF Client with Azure Queue Storage. Now you can send messages to your heart’s content, leveraging the power and scalability of Azure’s cloud infrastructure .

Conclusion

Azure Queue Storage is causing a revolution in .NET messaging, offering developers a powerful tool to boost their applications’ scalability and resilience. By integrating CoreWCF and WCF Client with Azure Queue Storage, you’re tapping into a world of possibilities, from handling massive workloads to building flexible, decoupled systems. This integration opens doors to improved performance, cost-effectiveness, and robust security, all backed by Microsoft’s substantial investment in cybersecurity.

As you dive into this exciting world of cloud-based messaging, remember that Azure Queue Storage isn’t just a tool – it’s a game-changer for your .NET applications. Whether you’re using CoreWCF or WCF Client, the straightforward setup process and powerful features make it a breeze to get started. So why wait? It’s time to give Azure Queue Storage a shot and see how it can take your messaging to new heights. Your apps (and your users) will thank you for it!

GraphQL Query Execution in .NET: A Comprehensive Guide

No Comments »

GraphQL queries have revolutionized the way developers interact with APIs, offering a more flexible and efficient approach to data fetching. As you delve into the world of GraphQL in .NET, you’ll discover how this powerful query language can streamline your application’s data management. With its ability to request precisely the data you need and nothing more, GraphQL has a significant impact on performance and developer productivity.

In this comprehensive tutorial, you’ll learn to set up a GraphQL environment in .NET and create basic queries. You’ll also explore advanced techniques to enhance your query execution skills. By the end, you’ll have a solid grasp of GraphQL query execution in .NET, enabling you to build more efficient and scalable applications. Whether you’re new to GraphQL or looking to deepen your knowledge, this guide will equip you with the tools to leverage GraphQL queries effectively in your .NET projects.

Setting Up the GraphQL Environment in .NET

To get started with GraphQL in your .NET project, you’ll need to set up the necessary environment. This involves installing the required packages, configuring the GraphQL client, and downloading the GraphQL schema. Let’s walk through these steps to ensure you have a solid foundation for working with GraphQL queries in .NET.

Installing Required Packages

To begin, you’ll need to add the essential packages to your .NET project. GraphQL.NET provides several packages to support different functionalities. Here’s how to install the core packages:

  1. Install the main GraphQL.NET engine:
    > dotnet add package GraphQL
  2. Add a serializer package. You have two options:
    > dotnet add package GraphQL.SystemTextJson
    or
    > dotnet add package GraphQL.NewtonsoftJson
  3. For document caching, install:
    > dotnet add package GraphQL.MemoryCache
  4. If you need DataLoader functionality:
    > dotnet add package GraphQL.DataLoader
  5. For advanced dependency injection:
    > dotnet add package GraphQL.MicrosoftDI

Configuring the GraphQL Client

After installing the packages, you’ll need to configure the GraphQL client in your .NET application. This step involves setting up the necessary services and middleware.

  1. Add the required services to your dependency injection container. This typically involves registering the GraphQL types and schemas you’ll be using.
  2. Configure the GraphQL middleware to expose your GraphQL server at an endpoint. This allows you to access the GraphQL playground and execute queries.
  3. If you’re using subscriptions, ensure that your DocumentExecuter is properly configured to handle them alongside queries and mutations.

Downloading the GraphQL Schema

To work effectively with a GraphQL API, you’ll need to download its schema. This schema defines the types and operations available in the API. Here’s how to do it:

  1. Use the Strawberry Shake CLI tool to download the schema. First, install the tool:
    dotnet new tool-manifest
    dotnet tool install StrawberryShake.Tools –local
  2. Run the following command to initialize your project with a GraphQL schema:
    dotnet graphql init <ServerUrl> -n <ClientName>
    Replace <ServerUrl> with your GraphQL server’s URL and <ClientName> with your desired client name .
  3. This command will generate the schema files in your project, including schema.graphql and schema.extensions.graphql.
  4. To keep your schema up-to-date, you can use the update command from here.

By following these steps, you’ll have set up a robust GraphQL environment in your .NET project, ready for executing queries and building powerful GraphQL-enabled applications.

Creating and Executing Basic GraphQL Queries

Now that you’ve set up your GraphQL environment in .NET, it’s time to dive into creating and executing your first queries. GraphQL offers a more flexible and efficient approach to data fetching, allowing you to request exactly what you need and nothing more.

Writing Your First Query

To get started with GraphQL queries, you’ll need to understand the syntax and structure. Here’s how to write your first query:

  1. Open your GraphQL IDE or playground. If you’ve set everything up correctly, you should be able to access it at http://localhost:5000/graphql (your port might differ) .
  2. Click on “Create document” in the IDE. You’ll see a settings dialog for the new tab. Make sure the “Schema Endpoint” input field has the correct URL for your GraphQL endpoint .
  3. In the top left pane of the editor, paste the following query:
    {
      book {
        title
        author {
          name
        }
      }
    }
    This query requests the title of a book and the name of its author .
  4. To execute the query, simply press the “Run” button. The result will be displayed as JSON in the top right pane .

Parsing and Handling Query Results

Once you’ve executed your query, you’ll need to parse and handle the results in your .NET application. Here’s how to do it:

  1. Create a GraphQLQuery class to handle the query and variables:
    public class GraphQLQuery
    {
    public string Query { get; set; }
    public Dictionary<string, string> Variables { get; set; }
    }
  2. Deserialize the JSON request into the GraphQLQuery object:
    var request = "{\"query\":\"query RouteQuery { viewer { routes{ createdOn, machine } } }\",\"variables\":{\"one\":\"two\"}}";
    var query = JsonConvert.DeserializeObject<GraphQLQuery>(request);
  3. Use the ToInputs() method to convert the variables to an Inputs object:
    var inputs = query.Variables.ToInputs();
  4. Execute the query using the DocumentExecuter:
    var result = await _executer.ExecuteAsync(_schema, null, query.Query, query.OperationName, inputs);
  5. Handle the result in your application logic, extracting the data you need from the ExecutionResult object .

By following these steps, you’ll be able to create and execute basic GraphQL queries in your .NET application, taking advantage of GraphQL’s flexibility and efficiency in data fetching.

Advanced Query Techniques

Using Variables in Queries

To enhance your GraphQL queries, you can leverage variables to make them more dynamic and reusable. Variables allow you to pass values from your application or users to your queries and mutations. This approach is particularly useful when you need to build queries that accept input from search boxes or column filters .

To use variables, you define them in your query and then provide their values separately. Here’s an example of a query with a variable:

query DroidQuery($droidId: String!) {
 droid(id: $droidId) {
   id
   name
 }
}

The corresponding JSON request would look like this:

{
 "query": "query DroidQuery($droidId: String!) { droid(id: $droidId) { id name } }",
 "variables": {
   "droidId": "1"
 }
}

To parse this JSON request in your .NET application, you can use the GraphQLSerializer:

var request = new GraphQLSerializer().Deserialize<GraphQLRequest>(requestJson);
var result = await schema.ExecuteAsync(options => {
   options.Query = request.Query;
   options.Variables = request.Variables;
});

Implementing Pagination

Pagination is crucial for managing large datasets efficiently. With Hot Chocolate, implementing pagination in your GraphQL queries is straightforward. You can use the UsePaging attribute to set up cursor-based pagination .

Here’s how to implement pagination:

  1. Add the UsePaging attribute to your query:
public IQueryable<CourseType> GetPaginatedCourses([Service] SchoolDbContext dbContext)
{
   return dbContext.Courses.Select(c => new CourseType { /* ... */ });
}
  1. In your query, you can now use pagination arguments:
query {
 paginatedCourses(first: 3) {
   edges {
     node {
       id
       name
     }
     cursor
   }
   pageInfo {
     hasNextPage
     endCursor
   }
   totalCount
 }
}

This approach allows you to apply pagination directly to your database query, improving performance by only retrieving the necessary data .

Handling Errors

Proper error handling is essential for creating robust GraphQL applications. Apollo Client categorizes errors into two main types: GraphQL errors and network errors .

GraphQL errors are related to server-side execution and include syntax errors, validation errors, and resolver errors. These errors are included in the errors array of the server’s response .

To handle errors effectively, you can define an error policy for your operations. Apollo Client supports three error policies:

  1. none: The default policy, which sets data to undefined if there are GraphQL errors.
  2. ignore: Ignores GraphQL errors and caches any returned data.
  3. all: Populates both data and error.graphQLErrors, allowing you to render partial results and error information .

To specify an error policy, use the options object in your operation hook:

const { loading, error, data } = useQuery(MY_QUERY, { errorPolicy: "all" });

By implementing these advanced query techniques, you’ll be able to create more flexible, efficient, and robust GraphQL applications in .NET.

Conclusion

GraphQL query execution in .NET has a significant impact on how developers interact with APIs, offering a more flexible and efficient approach to data management. This tutorial has walked you through the process of setting up a GraphQL environment, creating basic queries, and exploring advanced techniques to enhance your query execution skills. By leveraging variables, implementing pagination, and handling errors effectively, you can build more robust and scalable applications that make the most of GraphQL’s capabilities.

As you continue to work with GraphQL in your .NET projects, keep in mind the importance of writing clean, efficient queries and handling results properly. The techniques covered in this guide provide a solid foundation to build upon, enabling you to create powerful GraphQL-enabled applications. Remember, practice and experimentation are key to mastering these concepts and unlocking the full potential of GraphQL in your development workflow.

.NET Smart Components: Revolutionizing UI with AI Power

No Comments »

In the ever-evolving world of software development, .NET smart components are causing a revolution in user interface design. These innovative tools combine the power of artificial intelligence with the flexibility of .NET components, offering developers a new way to create dynamic and responsive user interfaces. As you explore the possibilities of smart components, you’ll discover how they can transform your approach to building intuitive and efficient applications.

You’ll gain insights into the key features that set .NET smart components apart from traditional UI elements. We’ll walk you through the process of implementing these AI-powered components in your projects, highlighting best practices and potential pitfalls to watch out for. Additionally, you’ll learn about the impact of smart components on development workflows and user experiences. By the end of this article, you’ll have a solid understanding of how .NET smart components can boost your productivity and take your applications to the next level.

Understanding .NET Smart Components

What are .NET Smart Components?

.NET Smart Components are pre-built, AI-powered UI elements designed to enhance your web applications quickly and easily. These components allow you to add genuinely useful AI features to your .NET apps without spending weeks redesigning your user experience or delving into complex machine learning and prompt engineering. By simply dropping these components into your existing user interfaces, you can upgrade your app’s functionality and make your users more productive.

The AI-powered revolution in UI development

Smart Components are causing a revolution in UI development by combining the power of artificial intelligence with the flexibility of .NET components. They offer a range of features that can significantly improve user experience and productivity:

  1. SmartPaste: A button that automatically fills out forms using data from the user’s clipboard, helping users add information from external sources without retyping.
  2. SmartTextArea: An intelligent upgrade to the traditional textarea that autocompletes whole sentences using your preferred tone, policies, and URLs.
  3. SmartComboBox: An enhanced version of the traditional combobox that makes suggestions based on semantic matching, helping users find what they’re looking for more easily.
  4. Local Embeddings: A general capability you can use to power your own features, such as search or retrieval-augmented generation (RAG).

These components are designed to work with ASP .NET Core 6.0 and later, supporting both Blazor and MVC/Razor Pages.

Current experimental status

It’s important to note that .NET Smart Components are currently an experiment from the .NET team. The purpose of this experiment is to assess how the .NET community would use pre-built UI components for AI features. The components are not yet an officially supported part of .NET, and their future support depends on community feedback and usage levels.

To help shape the future of these components, you’re encouraged to share your thoughts by filling out the .NET Smart Components survey. Your feedback will be crucial in determining whether Smart Components graduate to full support and what additional capabilities might be added in the future.

As the experiment progresses, the set of components and features may expand over time. The .NET team is also considering providing components for other .NET UI frameworks, such as .NET MAUI, WPF, and Windows Forms.

Key Features of .NET Smart Components

.NET Smart Components offer a range of innovative features that can significantly enhance your web applications. These AI-powered tools are designed to boost productivity and improve user experience without requiring extensive redesigns or complex machine learning implementations.

Smart Paste: Automating form filling

Smart Paste is a powerful feature that allows users to automatically fill out forms using data from their clipboard. This intelligent button can be easily integrated into any existing form in your web application, making it a versatile addition to your user interface.

Here’s how Smart Paste works:

  1. Users copy information from an external source, such as an email or document.
  2. They click the Smart Paste button in your application.
  3. The system automatically populates relevant form fields with the copied data.

For example, if a user copies a mailing address, Smart Paste can fill out separate fields for name, address lines, city, and state without manual typing or individual copy-paste actions. This feature is particularly useful for:

  • Creating new issues in bug tracking systems
  • Populating customer information in CRM applications
  • Filling out support ticket forms

Smart Paste is designed to work with any form without requiring specific configuration or annotations. The system intelligently infers field meanings from your HTML, though you can provide optional annotations for improved results.

Smart TextArea: Intelligent text completion

Smart TextArea is an AI-powered upgrade to the traditional textarea element. It offers suggested autocompletions for whole sentences based on its configuration and the user’s current input. This feature is particularly beneficial for:

  • Customer support systems
  • Live chat interfaces
  • CRM applications
  • Bug tracking systems

The key advantage of Smart TextArea is its ability to incorporate your preferred tone, policies, and specific phrases into suggestions. This helps maintain consistency in communication while allowing flexibility for your team.

For instance, in an HR system, typing “Your vacation allowance is” might prompt a suggestion like “28 days as detailed in our policy at https://…/policies/vacation”.

Smart ComboBox: Semantic suggestion engine

Smart ComboBox enhances the traditional combo box by offering semantic matches instead of just exact substring matches. This upgrade significantly improves user experience, especially when users are unsure of the exact predefined string they’re looking for.

Key benefits of Smart ComboBox include:

  1. Improved search functionality
  2. Reduced data entry errors
  3. Enhanced user efficiency

For example, in an expense tracking app, typing “plane tic” might suggest “Transport: Airfare” as the correct accounting category. Similarly, in a bug tracking system, entering “slow” could prompt suggestions like “Performance” or “Usability” for issue labels.

Smart ComboBox uses embeddings to achieve semantic matching, converting natural language strings into numerical vectors for comparison. This process can be performed efficiently on your server without requiring a GPU.

By incorporating these Smart Components into your .NET applications, you can significantly enhance user productivity and streamline data entry processes.

Implementing .NET Smart Components

Setting up the development environment

To start using .NET Smart Components, you need to have the latest version of the .NET framework installed. Begin by ensuring you have a current .NET SDK for Windows, Linux, or Mac. For ASP .NET Core 6.0 and later, you can use these components with either Blazor or MVC/Razor Pages.

To set up your environment:

  1. Create a new Blazor project or use an existing one ( .NET 6 or later).
  2. Install the required NuGet packages:
    • For the server project: SmartComponents.AspNetCore
    • For WebAssembly projects: SmartComponents.AspNetCore.Components

Integrating components into existing apps

Once your environment is set up, you can start integrating .NET Smart Components into your application. Here’s how to do it:

  1. Register Smart Components in your Program.cs file:
    builder.Services.AddSmartComponents();
  2. Configure the OpenAI backend if you’re using SmartPaste or SmartTextArea.
  3. Add components to your pages. For example:
    <SmartPasteForm>
    <InputField Name=”ProjectName” />
    <InputField Name=”StartDate” />
    <InputField Name=”EndDate” />
    </SmartPasteForm>

Best practices for optimal performance

To get the most out of .NET Smart Components:

  1. Leverage existing codebases: These components are designed to integrate seamlessly with your current projects, reducing the need for extensive modifications.
  2. Optimize resource usage: Smart Components use advanced algorithms and machine learning models to minimize latency and improve overall application performance.
  3. Explore official documentation: Microsoft provides extensive guides, code examples, and online courses to help you understand and implement these components effectively.
  4. Gather user feedback: As these components are still experimental, collect and share user experiences to help shape their future development.

Conclusion

.NET Smart Components are causing a revolution in UI development, offering developers powerful tools to enhance their applications with AI capabilities. These components, including SmartPaste, SmartTextArea, and SmartComboBox, have a significant impact on streamlining data entry, improving user experiences, and boosting overall productivity. By integrating these tools into existing .NET projects, developers can quickly upgrade their apps without extensive redesigns or complex machine learning implementations.

As this technology continues to evolve, it’s crucial for developers to stay informed and provide feedback to shape its future. The experimental status of these components presents an exciting chance to explore new possibilities in AI-powered UI design. By embracing .NET Smart Components, developers can stay ahead of the curve and create more intuitive, efficient applications that meet the growing demands of modern users.

Effortless Native Binding for .NET MAUI Libraries Interop

No Comments »

Native binding has become a game-changer in the world of cross-platform app development, especially for .NET MAUI projects. This powerful technique allows developers to seamlessly integrate native libraries into their applications, unlocking a wealth of platform-specific features and optimizations. As the demand for high-performance, feature-rich mobile apps continues to grow, mastering native binding has become essential for developers looking to create cutting-edge solutions.

Article Image

This article will guide you through the ins and outs of native binding in .NET MAUI. It will start by explaining the basics of native binding and its importance in modern app development. Then, it will delve into the process of setting up a MAUI project for native library interop, followed by techniques to develop platform-specific wrappers. Finally, it will explore the steps to integrate these native libraries into .NET MAUI applications, providing developers with the knowledge to enhance their apps’ capabilities and performance.

The Fundamentals of Native Binding in .NET MAUI

Native binding has revolutionized cross-platform app development, particularly in .NET MAUI projects. This powerful technique allows developers to seamlessly integrate native libraries into their applications, unlocking a wealth of platform-specific features and optimizations .

Traditional binding vs. Native Library Interop

Native Library Interop, previously known as the “Slim Binding” approach, offers an alternative method for integrating native libraries into .NET MAUI applications. This approach enables direct access to native library APIs in a streamlined and maintenance-friendly manner, eliminating the need to bind entire libraries through traditional methods .

Traditional bindings involve creating a C# API definition to describe how the native API is exposed in .NET and how it maps to the underlying library. While this approach is still suitable for projects requiring extensive use of a library’s API or for vendors supporting .NET MAUI developers, Native Library Interop offers several advantages .

Key concepts and terminology

Native Library Interop involves creating a thin “wrapper” with a simplified API surface to access native SDKs. This approach is particularly effective when dealing with simple API surfaces involving primitive types that .NET supports .

One of the key benefits of Native Library Interop is that it allows developers to leverage existing documentation provided by libraries to write in native languages directly – Swift / Objective-C for iOS and Mac Catalyst, and Java / Kotlin for Android .

Advantages for cross-platform development

Native Library Interop offers several advantages for cross-platform development:

  1. Simplified implementation: The process is often easier to understand, implement, and maintain compared to traditional bindings .
  2. Easier updates: Managing updates to underlying SDKs generally requires less effort. Updates often involve simply adjusting the version and rebuilding the project .
  3. Stability: Even if breaking changes occur in the API surfaces or SDKs, the wrapper API surface and .NET application’s usage are more likely to remain stable, requiring fewer adjustments compared to traditional bindings .
  4. Flexibility: Native Library Interop is not limited to just binding libraries and can technically be used to tap deeper into the native platform SDKs .

By embracing Native Library Interop, developers can create more robust and efficient cross-platform applications, taking full advantage of platform-specific features while maintaining a streamlined development process.

Preparing Your Project for Native Library Interop

Developers embarking on native library interop for .NET MAUI projects need to set up their environment carefully. This process involves several key steps to ensure smooth integration across platforms.

Setting up the project structure

To begin, developers should clone the Maui.NativeLibraryInterop repository . This repository serves as a starting point for creating new bindings or consuming existing ones . The template within the repository contains the foundation for Android, iOS, and Mac Catalyst bindings, along with a .NET MAUI sample app .

Configuring build tools and scripts

For efficient development, it’s crucial to have the right tools installed. Visual Studio 2022 17.8 or greater, with the .NET Multi-platform App UI workload, is essential . Developers targeting iOS from Windows will need a Mac build host .

To set up the project:

  1. Create a new .NET MAUI App project in Visual Studio .
  2. Choose the desired .NET version .
  3. Configure the development environment for each target platform (Android, iOS, Windows) .

Managing dependencies across platforms

Managing dependencies across platforms requires careful attention. For Android, developers need to:

  1. Open the native project in Android Studio .
  2. Confirm the compileSdk version in build.gradle.kts .
  3. Add relevant maven repositories .

For iOS and Mac Catalyst:

  1. Open the native project in Xcode .
  2. Check supported destinations and iOS versions .

Developers should also consider using dependency injection to manage app dependencies effectively . This approach facilitates building loosely coupled apps and provides features for registering type mappings, resolving objects, and managing object lifetimes .

Developing Platform-Specific Wrappers

Developing platform-specific wrappers is a crucial step in native binding for .NET MAUI. This process involves creating thin “wrappers” with simplified API surfaces to access native SDKs, enabling seamless integration of platform-specific features into cross-platform applications.

Creating an iOS wrapper using Objective-C/Swift

For iOS and Mac Catalyst, developers can create wrappers using Objective-C or Swift in Xcode. This approach is particularly effective when dealing with simple API surfaces involving primitive types that .NET supports . Developers can define their desired APIs in Swift, importing the necessary libraries and implementing the required functionality. For instance, to create an API interface for Charts, one would import the DGCharts library and define the API for creating a pie chart .

Implementing an Android wrapper with Java/Kotlin

Android wrappers are developed using Java or Kotlin in Android Studio. The process involves importing the necessary libraries and defining the APIs. While the libraries for Android and iOS are often parallel, they may be implemented differently, affecting how APIs are imported and defined . .NET for Android employs various approaches to bridge the Java VM and the Managed VM, using the Java Native Interface (JNI) to enable communication between Java/Kotlin and managed code .

Ensuring API consistency across platforms

To maintain consistency across platforms, developers should focus on creating a unified API surface that can be accessed from .NET MAUI. This involves:

  1. Defining similar method signatures and class structures for both iOS and Android wrappers.
  2. Using platform directives in the .NET MAUI project to leverage the created APIs directly .
  3. Implementing native methods using the native keyword in Java, which the Java VM will invoke using JNI when called from Java code .

By following these practices, developers can create robust platform-specific wrappers that seamlessly integrate with .NET MAUI applications, enhancing their capabilities and performance across different platforms.

Integrating Native Libraries into .NET MAUI

Generating and customizing API definitions

Developers can create API interfaces between native projects and .NET binding projects by making updates in specific files. For iOS and Mac Catalyst, modifications are made in the Swift file defining the public API surface . On the Android side, updates are performed in the Java file within the module directory . These API definitions serve as the bridge between native libraries and .NET MAUI applications.

Handling platform-specific features

To invoke platform code from cross-platform code, developers can use conditional compilation to target different platforms . This approach allows for the implementation of platform-specific features while maintaining a unified codebase. For example, retrieving device orientation requires writing platform-specific code using conditional compilation .

Optimizing performance and memory usage

Performance optimization is crucial for .NET MAUI applications. Developers can use profiling tools like dotnet-trace to identify performance bottlenecks . Compiled bindings can improve data binding performance by resolving expressions at compile time, typically 8-20 times faster than classic bindings . Reducing the number of elements on a page and using resource dictionaries efficiently can also enhance performance . Additionally, implementing asynchronous programming techniques, such as the Task-based Asynchronous Pattern (TAP), can improve overall app responsiveness .

Conclusion

Native binding in .NET MAUI has a significant impact on cross-platform app development, enabling developers to tap into platform-specific features and boost performance. The shift towards Native Library Interop offers a more straightforward approach to integrate native libraries, making it easier to maintain and update projects. This method allows developers to leverage existing documentation and write code directly in native languages, leading to more robust and efficient applications.

To wrap up, the process of implementing native binding involves careful project setup, creating platform-specific wrappers, and seamlessly integrating these components into .NET MAUI applications. By following best practices in API consistency and performance optimization, developers can create powerful cross-platform apps that take full advantage of native capabilities. This approach opens up new possibilities to create cutting-edge mobile solutions that meet the growing demand for feature-rich, high-performance applications.

Revolutionizing Cross-Platform App Development: A Deep Dive into .NET MAUI and .NET 8

No Comments »

In a landmark moment for the world of cross-platform app development, the highly anticipated release of .NET MAUI in .NET 8 has emerged as a game-changer, poised to revolutionize the way applications are built and deployed across diverse platforms. Designed to empower .NET developers with unparalleled flexibility and efficiency, .NET MAUI offers a comprehensive solution for crafting cross-platform applications for Android, iOS, macOS, and Windows. With its seamless integration of native functionalities, platform-specific user interfaces, and innovative hybrid experiences, .NET MAUI stands at the forefront of a new era in application development.

The release of .NET 8 represents a significant milestone in the evolution of .NET MAUI, marked by a series of groundbreaking advancements and quality enhancements. Noteworthy achievements include:

  • A staggering 1618 pull requests merged, reflecting a collaborative effort of unprecedented scale and scope.
  • Resolution of 689 bug issues, indicative of a relentless commitment to refining and enhancing the framework’s stability and performance.

These achievements underscore the dedication and ingenuity of the development community, with contributions from diverse teams at Microsoft and the broader community shaping .NET MAUI into a robust and versatile framework that meets the evolving needs of developers worldwide.

A Focus on User Experience: Key Areas of Improvement

In response to invaluable user feedback, .NET MAUI has prioritized key areas for improvement, including:

  • Optimization of keyboard behavior to ensure seamless user interaction across different devices and platforms.
  • Enhanced support for right-to-left languages, catering to a global audience and facilitating localization efforts.
  • Improvements in layout fidelity and performance, guaranteeing a consistent and responsive user experience across various screen sizes and resolutions.
  • Streamlined scroll performance for smoother navigation and enhanced usability.
  • Advanced memory management techniques to optimize resource utilization and enhance overall application performance.

These refinements aim to elevate the development experience and empower developers to create engaging and immersive cross-platform applications that resonate with users worldwide.

Exploring the Latest Innovations in .NET MAUI

Keyboard Accelerators: Empowering Productivity

The introduction of keyboard accelerators enables developers to associate shortcuts with menu items in desktop applications, thereby enhancing productivity and streamlining user interactions. This feature empowers users to perform tasks more efficiently, leveraging keyboard commands for swift execution.

Enhancing Interactivity

.NET MAUI introduces enhancements to PointerGesture, allowing developers to leverage PointerPressed and PointerReleased events for more precise interaction tracking. These enhancements foster greater user engagement and responsiveness across multiple platforms, creating a more immersive and intuitive user experience.

Customizing User Experience

Enhancements to drag and drop gestures provide developers with greater control and flexibility in customizing the user experience. With features such as custom glyphs, captions, and drop actions, .NET MAUI empowers developers to create intuitive and immersive applications that cater to the unique needs and preferences of their users.

Performance and Memory Improvements

.NET 8 introduces significant improvements in performance, app size, and memory management, enabling developers to create smoother and more efficient applications. New features such as AndroidStripILAfterAOT, AndroidEnableMarshalMethods, and NativeAOT for iOS optimize application performance and resource utilization, ensuring a superior user experience.

Enriching the Development Experience

From enhanced WebView capabilities to improvements in TapGestureRecognizer and Blazer WebView, .NET 8 introduces a myriad of new features and enhancements that enrich the development experience. These updates empower developers to create high-quality cross-platform applications with ease, fostering creativity and innovation in the development process.

Community Contributions and Support

One of the hallmarks of the .NET MAUI project is the vibrant and inclusive community that actively participates in its development and evolution. With a total of 94 contributors, including teams from Microsoft and dedicated community members, the collaborative effort behind .NET MAUI underscores the collective passion and commitment to driving innovation in cross-platform app development.

The diverse perspectives and expertise brought forth by community contributors have played a pivotal role in shaping the direction and feature set of .NET MAUI. Through open communication channels, forums, and collaborative platforms, developers from all backgrounds have the opportunity to contribute code, provide feedback, and share insights, fostering an environment of continuous improvement and shared learning.

Embracing The Future

As .NET MAUI and .NET 8 continue to evolve and mature, the future of cross-platform app development looks brighter than ever before. With ongoing advancements, feature enhancements, and community-driven initiatives, .NET MAUI is poised to remain at the forefront of innovation, empowering developers to create next-generation applications that transcend boundaries and redefine user experiences.

By embracing collaboration, innovation, and continuous learning, developers can unlock the full potential of .NET MAUI and .NET 8, paving the way for a future where cross-platform app development knows no limits.

Getting Started

Developers can access .NET MAUI and .NET 8 through the latest stable release of Visual Studio 2022 17.8 or utilize Visual Studio Code with the .NET MAUI extension for a versatile development environment.

  dotnet workload install maui 

The .NET 8 installer and command-line tools simplify installation and setup, enabling developers to hit the ground running with .NET MAUI and embark on their journey towards creating innovative cross-platform applications.

Conclusion

In conclusion, the release of .NET MAUI in .NET 8 heralds a new era of possibilities for cross-platform app development. With its robust framework, powerful features, and vibrant community, .NET MAUI empowers developers to create immersive, feature-rich applications that delight users across diverse platforms.

As developers embark on their journey with .NET MAUI and .NET 8, they are poised to redefine the way applications are built, deployed, and experienced in the digital age. By embracing collaboration, innovation, and creativity, developers can unlock endless opportunities and shape the future of cross-platform app development for generations to come.

Together, let us embrace the future and embark on a journey of exploration, discovery, and innovation with .NET MAUI and .NET 8. The possibilities are limitless, and the future is ours to create.

Empowering Developers: Exploring the Innovations of ML.NET 3.0

No Comments »

ML.NET, the open-source machine learning framework for .NET developers, has just unveiled its highly anticipated version 3.0, packed with an array of new features and enhancements. This release marks a significant milestone in the evolution of ML.NET, empowering developers to seamlessly integrate custom machine learning models into their .NET applications with ease and efficiency.

Expanding Deep Learning Capabilities

One of the most exciting aspects of the ML.NET 3.0 release is the substantial expansion of deep learning scenarios. With the integration of TorchSharp and ONNX models, developers can now leverage cutting-edge capabilities in Object Detection, Named Entity Recognition (NER), and Question Answering (QA). These advancements open up a plethora of possibilities for applications requiring advanced computer vision and natural language processing capabilities.

Object Detection

Object detection, a crucial computer vision problem, has been significantly enhanced in ML.NET 3.0. Leveraging TorchSharp-powered Object Detection APIs, developers can now perform image classification at a granular scale, accurately locating and categorizing entities within images. This feature is particularly useful in scenarios where images contain multiple objects of different types, enabling developers to build more sophisticated and intelligent applications.

Named Entity Recognition and Question Answering

Natural Language Processing (NLP) has seen remarkable advancements in the areas of Named Entity Recognition (NER) and Question Answering (QA). With ML.NET 3.0, developers can harness the power of TorchSharp RoBERTa text classification features to unlock these capabilities within their applications. The NER and QA trainers included in the release empower developers to extract valuable insights from textual data, facilitating more intelligent and context-aware applications.

Intel oneDAL Training Acceleration

ML.NET 3.0 introduces Intel oneDAL training acceleration, a groundbreaking feature that leverages highly optimized algorithmic building blocks to speed up data analysis and machine learning processes. By harnessing the power of SIMD extensions in 64-bit architectures, Intel oneDAL accelerates training tasks, enhancing the overall performance and efficiency of ML.NET applications. This integration represents a significant leap forward in training efficiency, enabling developers to train models faster and more effectively than ever before.

Automated Machine Learning (AutoML)

Automated Machine Learning (AutoML) is another key feature of ML.NET 3.0, automating the process of applying machine learning to data. With several new capabilities added to the AutoML experience, developers can now explore a wider range of machine learning scenarios. The AutoML Sweeper now supports Sentence Similarity, Question Answering, and Object Detection, expanding the scope of automated model generation. Additionally, continuous resource monitoring ensures the stability and reliability of long-running experiments, enabling developers to avoid crashes and failed trials.

DataFrame Enhancements

ML.NET 3.0 brings a plethora of enhancements to DataFrame, the versatile data manipulation tool. Community contributions, such as those from Aleksei Smirnov, have played a crucial role in improving DataFrame functionality. With support for String and VBuffer column types, increased data storage capacity, and enhanced data loading scenarios, DataFrame has become even more powerful and flexible. These enhancements streamline the data processing pipeline, empowering developers to work with large datasets more efficiently.

Integration with Tensor Primitives

ML.NET 3.0 integrates seamlessly with Tensor Primitives, a set of APIs that introduce support for tensor operations. This integration not only improves performance but also enhances the usability and functionality of ML.NET. By leveraging Tensor Primitives, developers can perform complex tensor operations with ease, unlocking new possibilities for advanced machine learning applications. Additionally, the integration serves as a valuable testing ground for the TensorPrimitives APIs, ensuring their stability and reliability in real-world scenarios.

Enhanced Integration with TorchSharp and ONNX Models

The integration with TorchSharp and ONNX models in ML.NET 3.0 opens up new avenues for developers to leverage state-of-the-art deep learning models in their applications. TorchSharp, a .NET binding to the popular PyTorch library, provides access to a vast array of pre-trained models and enables seamless interoperability between .NET and Python environments. With ONNX (Open Neural Network Exchange), developers can easily import and export models between different deep learning frameworks, facilitating collaboration and knowledge sharing within the machine learning community. By harnessing the power of TorchSharp and ONNX, developers can tap into a wealth of resources and expertise to accelerate their deep learning initiatives and build more sophisticated and intelligent applications.

Streamlined Data Processing with DataFrame

DataFrame, a core component of ML.NET, has undergone significant enhancements in version 3.0, making data processing tasks more efficient and intuitive. With support for String and VBuffer column types, developers can now work with a wider range of data formats and structures, enhancing the flexibility and versatility of DataFrame. Additionally, improvements to data loading scenarios enable seamless integration with SQL databases and other data sources, simplifying the process of importing and exporting data. These enhancements empower developers to handle large datasets with ease, enabling them to extract valuable insights and drive informed decision-making in their applications.

Community Contributions and Collaboration

The success of ML.NET 3.0 would not have been possible without the invaluable contributions and collaboration of the developer community. Community members such as Aleksei Smirnov and Andras Fuchs have played a crucial role in enhancing DataFrame functionality and implementing new features. Their dedication and expertise have enriched the ML.NET ecosystem and contributed to the overall success of the framework. Moving forward, the ML.NET team remains committed to fostering an inclusive and collaborative environment where developers from all backgrounds can contribute their ideas, insights, and expertise to drive innovation and excellence in machine learning.

Future Roadmap and Innovation

Looking ahead, the ML.NET team is already hard at work on the next iteration of the framework, with plans for .NET 9 and ML.NET 4.0 in the pipeline. As the field of machine learning continues to evolve, the team remains focused on expanding deep learning capabilities, enhancing DataFrame functionality, and integrating new APIs and technologies into the framework. With each new release, ML.NET aims to push the boundaries of what’s possible in machine learning for .NET developers, empowering them to build smarter, more efficient, and more impactful applications. Stay tuned for more updates and announcements as we continue our journey towards the future of machine learning with ML.NET.

Conclusion

In conclusion, ML.NET 3.0 represents a significant milestone in the evolution of machine learning for .NET developers. With expanded deep learning capabilities, enhanced data processing tools, and streamlined integration with cutting-edge technologies, ML.NET empowers developers to build intelligent, efficient, and scalable applications with ease. Whether you’re a seasoned machine learning practitioner or just getting started with AI development, ML.NET provides the tools, resources, and community support you need to succeed. Embrace the power of machine learning in your .NET applications and unlock a world of possibilities with ML.NET 3.0.

Structure .NET Project with Clean Architecture

No Comments »

Using a clean architecture when developing software applications is very common. Maintainability is enhanced when distinct application layers are clearly defined by a clean architecture. Furthermore, to facilitate the transition to new technologies, the Clean Architecture approach strives to maintain the business logic’s independence from any external frameworks or libraries.

We will examine the application of clean architecture concepts in the organization of a .NET project.

The solution is split into four primary levels using the Clean Architecture approach:

  • Domain (central reasoning)
  • Use cases for applications
  • Infrastructure (caching, data access, etc.)
  • Display (open-access API)

Application of Clean Architecture

In a.NET project, how can a clean architecture be implemented?

Making a distinct project for each of the four layers depicted in the diagram is the simplest approach.

However, we will modify this strategy a little bit later in the piece.

Let us now discuss each layer separately.

Domain Layer

The domain logic of the application is specified at the domain layer. Entities, value objects, domain services, domain exceptions, domain events, repository interfaces, and other items are contained in this layer. The domain layer’s independence from all other layers is crucial. Only.NET primitive types (int, string, etc.) are necessary for it. There are two typical methods for organizing files into folders inside a domain project.

Sorting files according to their type would be the first option:

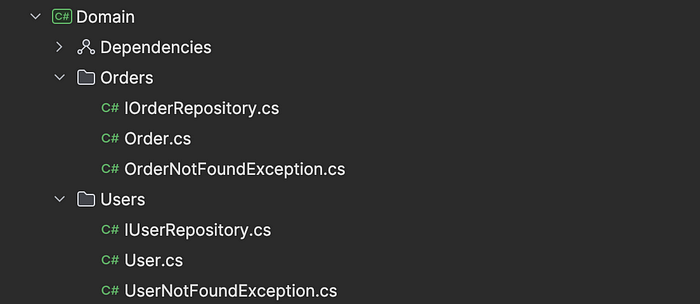
Every exception goes in the Exception folder, every entity goes in the Entities folder, and so on. Using entity folders is an alternative strategy. For instance, if the application has user and order-related domain logic, the file structure would resemble this:

Grouping by functionality by type (the first option) may be more effective for a big domain layer because it will be easier to choose a folder in which to place the file. Nonetheless, such challenges can arise with the second method, for instance, if the same value object is a part of multiple distinct entities.

Besides entities, value objects, repository interfaces, and domain exceptions, the Domain Layer should include aggregates, domain services, domain events, specifications, factories, and repositories. These components are essential for encapsulating business logic, maintaining transactional integrity, handling complex operations, and managing interactions with data storage mechanisms. By incorporating these elements, the Domain Layer becomes the focal point for expressing core business concepts and rules, thereby enhancing maintainability and flexibility in the application.

Application Layer

The use cases for an application are contained in the application layer. These use cases might be implemented as application service classes or as handlers for commands and queries. Additionally, infrastructure abstractions (such as those for emailing, caching, and other functions) are typically defined at the application layer.

This is an example of the folder structure:

The application layer only has a relationship to the domain layer in terms of references to other projects. It serves as the orchestrator of the system, coordinating interactions between the domain layer and the infrastructure layer. It ensures that business rules are applied correctly while leveraging external services and resources to fulfill the application’s requirements. By keeping this layer focused on use cases and abstractions, developers can achieve a clean separation of concerns and maintainability throughout the project’s lifecycle.

Infrastructure Layer

Application and domain layer abstractions are implemented via the infrastructure layer.

The following items may be found in the infrastructure layer:

  • Migrations of databases and repositories
  • The deployment of caching services
  • Identity provider implementation
  • Putting email providers into practice

The infrastructure layer can eventually grow too bloated if it is implemented as a single project. We can implement the infrastructure layer as a subdirectory containing different projects to get around this issue:

Apart from migrations, caching, and email services, additional components like external services integration, logging, data access implementations, file storage, security and authentication, background jobs, and message brokers can be included. These components facilitate interaction with external systems, logging application activities, accessing data, storing files, ensuring security, handling background tasks, and enabling communication between different parts of the application. This method offers a more effective division of responsibilities. To implement the abstractions defined in the domain and application projects, the infrastructure layer needs to make reference to them.

Presentation Layer

The application’s entry point is the presentation layer. It has a public API that external users and applications can connect with, such as RESTful endpoints. The Presentation layer also includes middlewares and other components required to handle incoming requests in addition to endpoints.

Furthermore, the presentation project serves as the foundation for the full solution’s development. The configuration for dependency injection is located in the composition root. Usually, the Program class’s extension methods are called in succession to do this:

builder.Services
   .AddDomainServices()
   .AddApplicationServices()
   .AddDataAccessServices()
   .AddEmailNotificationSErvices()
   .AddCachingServices();

The presentation layer must reference the application layer in order to execute application use cases.

Providing a user-friendly interface and controlling interactions with the application are the main priorities of the presentation layer. This comprises parts such as views, controllers, and user interface elements. Along with handling cross-cutting issues like error management and logging, it also takes care of security and authentication. It serves as a link between users and the hidden features of the application.

Wrapping Up

In conclusion, there are several advantages to using a Clean Architecture approach in a .NET project, such as improved scalability, maintainability, and adaptation to new technologies. Developers can retain the independence of business logic from external frameworks or libraries and provide a clear separation of concerns by organizing the project into various layers, namely domain, application, infrastructure, and presentation.

From specifying the fundamental domain logic to controlling user interactions via the presentation layer, each layer has a distinct function. This project organization not only encourages testability and code reuse, but it also makes it easier for development teams to collaborate and makes upgrades and revisions easier in the future.

ASP.NET Core in .NET 8 is here

No Comments »

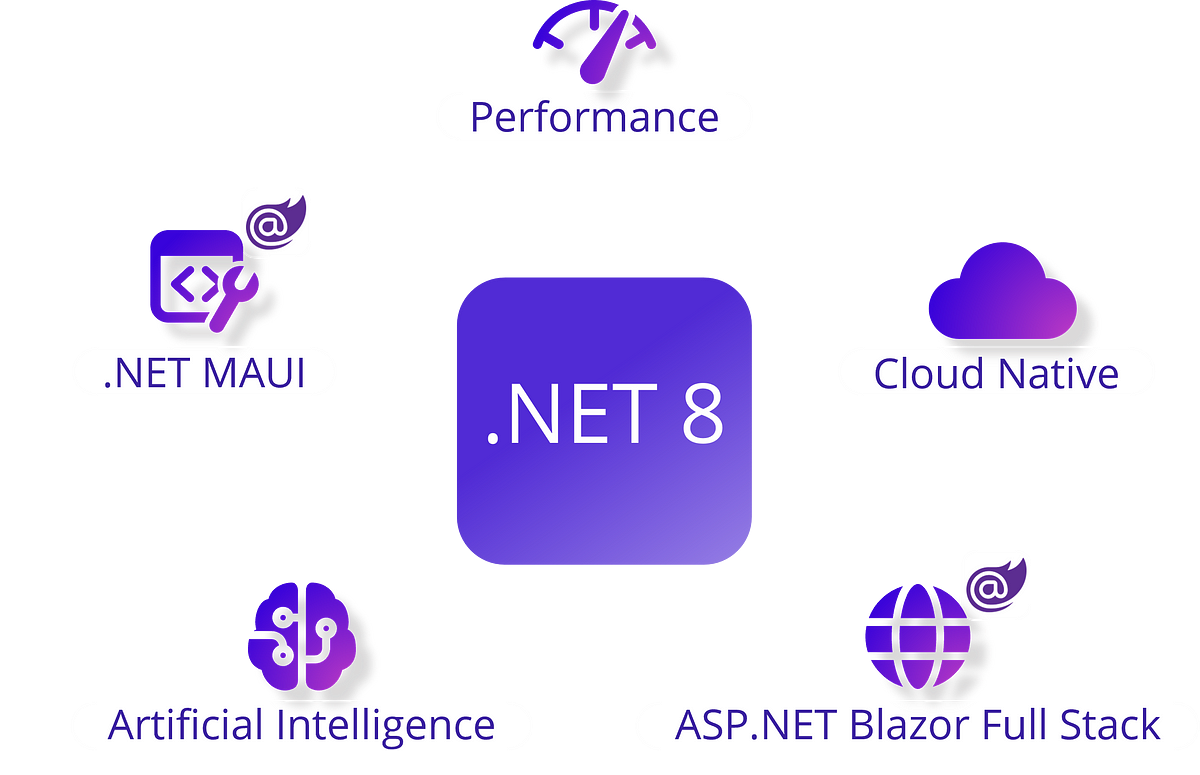
In .NET 8, ASP.NET Core provides a comprehensive solution for contemporary web development. It takes care of all your front-end and back-end web development requirements. Blazor offers dependable, high-performance backend APIs and services that let you create stunning, richly interactive web experiences. Cloud-native application development is made easy with ASP.NET Core in .NET 8, and productivity is enhanced by excellent tools in Visual Studio and Visual Studio Code. Every developer is a full stack developer with ASP.NET Core in .NET 8!

Let’s examine some of the fantastic enhancements and new features that ASP.NET Core in .NET 8 has to offer.

Advantages of Using Native AOT With ASP.NET Core

Publishing and deploying a native AOT program can bring the following advantages:

  • Reduced disk footprint: When publishing with native AOT, a single executable is created that includes the program as well as a subset of code from external dependencies that the program utilizes. Reduced executable size may lead to:
    • Smaller container images, such as those used in containerized deployments.
    • Smaller pictures lead to a faster deployment time.
  • Reduced startup time: The absence of JIT compilation allows native AOT programs to start up faster.
    • Reduced start-up time means the program can handle requests more quickly.
    • Improved deployment by using container orchestrators to control app version transitions.
  • Reduced memory demand: Because ASP.NET Core apps are published as native AOT, they can have lower memory demands depending on the work being done, as the new DATAS GC mode is automatically enabled. Reduced memory consumption can result in higher deployment density and better scalability.

AOT compatibility for both ASP.NET Core and native

Not every functionality in ASP.NET Core is compatible with native AOT. Similarly, not all libraries used in ASP.NET Core are compatible with native AOT. .NET 8 marks the beginning of efforts to enable native AOT in ASP.NET Core, with an emphasis on enabling support for apps that use Minimal APIs or gRPC and are deployed in cloud settings.

Native AOT apps have a few core compatibility requirements. The main ones include:

  • No dynamic loading (such as Assembly.LoadFile).
  • No runtime code generation by JIT (for example, System.Reflection.Emit)
  • No C++/CLI
  • No built-in COM (only applicable to Windows).
  • Requires trimming, which has restrictions.
  • Implies compilation into a single file with known incompatibilities.
  • Apps include required runtime libraries (like self-contained apps, increasing their size as compared to framework-dependent apps).

AOT with minimal APIs and native capabilities

Developers introduced the Request Delegate Generator (RDG) to ensure that Minimal APIs are compatible with native AOT. The RDG is a source generator that does similar work to the RequestDelegateFactory (RDF), converting the various MapGet(), MapPost(), and so on calls in your application into RequestDelegates associated with the specified routes, but it does so at compile time and generates C# code directly into your project. This removes the runtime creation of this code and ensures that the types used in your APIs are retained in your application code in a fashion that the native AOT tool-chain can statically analyze, guaranteeing that required code is not clipped. They’ve worked to guarantee that the RDG supports the majority of the Minimal API features you use today, making them compatible with native AOT.

.NET WebAssembly enhancements

Running .NET code on WebAssembly from the browser has been considerably enhanced in .NET 8. Your .NET code will run significantly quicker thanks to the new Jiterpreter-based runtime, which supports partial just-in-time (JIT) compilation for WebAssembly. With the new runtime, components render 20% quicker, and JSON deserialization is twice as quick!

The .NET WebAssembly runtime also supports numerous new edit types with Hot Reload, including full compatibility with CoreCLR’s Hot Reload capabilities and generic type editing. WebCIL, a new web-friendly packaging format for Blazor WebAssembly programs, simplifies deployment by eliminating all Windows-specific parts from.NET assemblies and repackaging them as WebAssembly files. WebCIL allows you to deploy your Blazor WebAssembly programs with certainty.

JavaScript SDK and project framework

Working with ASP.NET Core frequently necessitates the use of JavaScript and the JavaScript ecosystem. Bridging the .NET and JavaScript worlds can be difficult. The new JavaScript SDK and project system in Visual Studio make it simple to integrate .NET with frontend JavaScript frameworks. The JavaScript SDK integrates MSBuild, allowing you to build, run, debug, test, and publish JavaScript or TypeScript code alongside your .NET applications. You may easily interact with common JavaScript build tools such as WebPack, Rollup, Parcel, esbuild, and others.

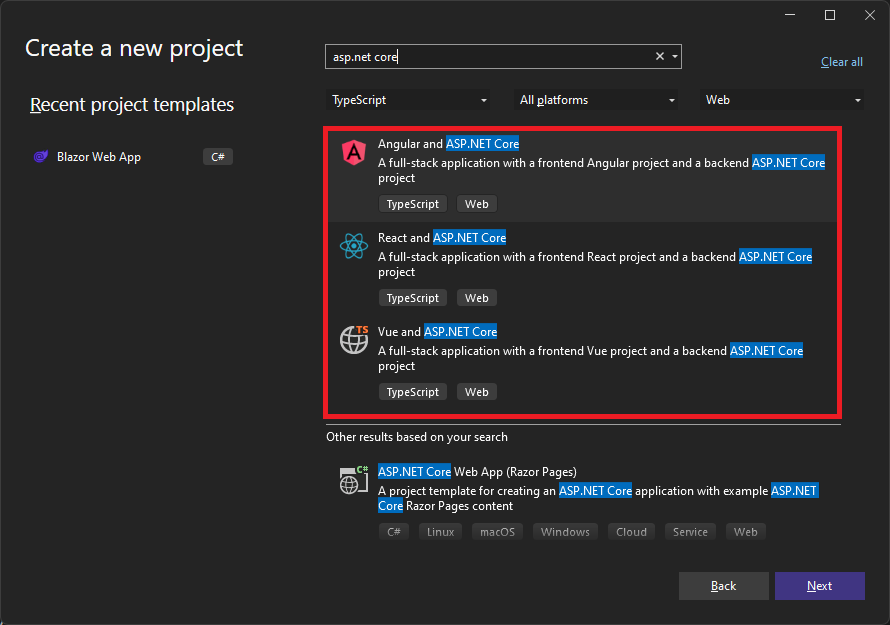
You can quickly get started using ASP.NET Core with Angular, React, and Vue using the provide Visual Studio templates.

These templates are available for both JavaScript and TypeScript, and the client app is generated using the most recent frontend JavaScript CLI tooling, ensuring that you always have the most recent version.

Debugging improvements

.NET’s sophisticated debugger is essential for developing any .NET app, including ASP.NET. In .NET 8, developers have improved the debugging visualization experience for commonly used types in ASP.NET Core apps, ensuring that the debugger displays the most critical information right immediately.

Check out all of the new ASP.NET debugging features in this Debugging Enhancements in .NET 8 blog post.

Wrapping Up

In conclusion, the advancements and new features introduced in ASP.NET Core in .NET 8 represent a significant leap forward in the realm of web development. The integration of Blazor provides a comprehensive solution for both front-end and back-end development, empowering developers to create stunning and highly interactive web experiences. .NET 8 is currently available. Upgrade your ASP.NET Core projects now!

Elevating Debugging Experience in .NET 8: A Deep Dive into Enhancements

No Comments »

In the ever-evolving landscape of web development, the debugging experience holds a paramount position for developers utilizing the .NET framework. With the advent of .NET 8, our commitment to refining and enhancing the debugging capabilities of frequently used types in .NET applications has taken center stage. This article provides a detailed exploration of the improvements made across crucial components, ushering in a new era of debugging proficiency.

A Closer Look at Debugging Enhancements

Improved Handling of HttpContext and Friends

For developers immersed in ASP.NET Core web app development, HttpContext, HttpRequest, and HttpResponse play pivotal roles. Viewing request and response values, such as headers, cookies, query strings, and form data, is considerably simpler. HttpRequest and HttpResponse now provide a user-friendly overview of the type. Essential information, such as the HTTP request URL or HTTP response status code, is immediately visible. This ensures a more intuitive debugging experience, allowing developers to effortlessly inspect headers, cookies, query strings, and form data. Notably, HttpRequest and HttpResponse now present concise and user-friendly summaries, displaying vital information such as the HTTP request URL and response status code.

.NET 7:

.NET 8:

WebApplication: Elevating Configuration Visibility

WebApplication, serving as the default configuration method for ASP.NET Core apps in Program.cs, has undergone significant updates in .NET 8. This includes the display of crucial information such as configured endpoints, middleware, and IConfiguration values directly within your IDE’s debugger. Similar refinements have been extended to the .NET Generic Host, enriching the debugging experience for apps without HTTP endpoints.

.NET 7:

.NET 8:

MVC and Razor Pages: Streamlined Debugging for Frameworks

The widely embraced ASP.NET Core MVC and Razor Pages frameworks have not been left untouched. In .NET 8, controllers, views, and Razor Pages have received targeted debugging enhancements. The focus has been on decluttering types and optimizing them for improved usability, resulting in a cleaner and more efficient debugging experience.

.NET 7:

.NET 8:

gRPC: Simplifying Client-Side Debugging

For developers leveraging gRPC, a high-performance RPC service library, .NET 8 brings simplifications to debugging client-side calls. The latest version of gRPC now includes comprehensive information about method, status, response headers, and trailers. Developers can benefit from a more insightful debugging experience, particularly when dealing with unary calls.

grpc-dotnet 2.55.0:

grpc-dotnet 2.56.0:

Endpoint Metadata: Enhancing Understanding of Endpoints

Endpoints are at the core of ASP.NET Core, representing executable request-handling code. Debugging Endpoint.Metadata has been enhanced in .NET 8, with the addition of debug text to common metadata. This improvement makes it easier to comprehend configured metadata and understand how requests are matched to endpoints.

.NET 7:

.NET 8:

Logging: Transforming ILogger for Debugging

Logging, powered by Microsoft.Extensions.Logging, is a cornerstone for .NET apps. In .NET 8, ILogger instances have undergone a transformation to be more debug-friendly. Displaying a user-friendly list of information, including name, log level, enablement status, and configured logging providers, ILogger now provides a more accessible debugging experience.

.NET 7:

.NET 8:

Configuration: Simplifying Configuration Understanding

Understanding an app’s configuration values has historically been challenging. In .NET 8, debugging Microsoft.Extensions.Configuration now presents a straightforward list of all configuration keys and values. With precedence already calculated, developers can easily grasp the configuration values that the app will use.

.NET 7:

.NET 8:

And More Across-the-Board Improvements

While the aforementioned improvements highlight key areas, .NET 8 brings a plethora of debugging enhancements across various components. From Dependency Injection to ClaimsPrincipal and ClaimsIdentity, StringValues and StringSegment, HostString, PathString, QueryString, FragmentString, HTTP header collections, to ASP.NET Core MVC’s ModelState, these improvements collectively contribute to a more refined debugging experience.

A Deeper Dive into Key Components

Dependency Injection

Dependency Injection (DI) plays a crucial role in modern software development, promoting code maintainability and scalability. In .NET 8, debugging enhancements have been introduced to streamline the visualization of DI, ensuring a clearer understanding of dependencies and their resolutions during debugging sessions.

ClaimsPrincipal and ClaimsIdentity

Authentication and authorization are fundamental aspects of web applications, and ClaimsPrincipal and ClaimsIdentity are central to managing user identities and access control. In .NET 8, debugging improvements in these components provide a more transparent view of claims, facilitating a smoother debugging experience for identity-related issues.

StringValues and StringSegment

Handling strings efficiently is paramount in any application. In .NET 8, improvements to StringValues and StringSegment aim to simplify string-related debugging challenges. Developers can now expect a more intuitive representation of string values during debugging, aiding in quicker issue identification and resolution.

HostString, PathString, QueryString, and FragmentString

In web development, understanding and manipulating URL components is crucial. .NET 8 introduces debugging enhancements to HostString, PathString, QueryString, and FragmentString, offering a clearer representation of URL-related data during debugging sessions. This facilitates a more straightforward identification of issues related to URL handling in applications.

HTTP Header Collections

HTTP headers play a vital role in web communication, and debugging issues related to header handling is common. In .NET 8, debugging improvements to HTTP header collections provide developers with enhanced visibility into requests, allowing for a more precise diagnosis of problems associated with headers during debugging sessions.

RouteValueDictionary

Routing is a critical component in web applications, and RouteValueDictionary is instrumental in handling route-related data. .NET 8 introduces debugging enhancements to RouteValueDictionary, offering augmented visibility into routing data during debugging. This facilitates a more insightful debugging experience when dealing with route-related issues.

ASP.NET Core MVC’s ModelState

In the world of ASP.NET Core MVC, ModelState is essential for handling and validating data models. Debugging ModelState has been streamlined in .NET 8, providing developers with a more organized and comprehensive view of model state information during debugging sessions. This ensures a more efficient debugging process when addressing model state-related issues.

Try It Now

Excited to experience these debugging enhancements in action? They are available in .NET 8 RC1, ready for exploration and feedback. To embark on this journey:

1. Download the latest .NET 8 release.

2. Launch Visual Studio 2022 or your preferred IDE.

3. Create an ASP.NET Core or Worker Service app.

4. Set breakpoints and run the app with debugging (F5).

keep looking »